I promise not to make any more recipes in a glass for the rest of the year.1 I just want to sneak this "last" one in - I couldn't bear not to share it.
It's like the Holidays in a glass.

It's also lovely and a snap to prepare - with few ingredients - which could be quite a welcome reprieve from a day spent preparing a grand holiday feast.
And... if, in the "excitement" of the holidays a dessert was forgotten or you need a last minute treat to bring to a holiday gathering, you don't necessarily have to revert to store-bought. All you need is about 20 minutes of cooking time and a couple hours of refrigeration, which can conveniently coincide with holiday gift wrapping, last-minute shopping/errands, a decompressing holiday bubble bath2...
If you don't have the 3-4 ingredients handy, it's only the 24th of December3 - the stores are still open.
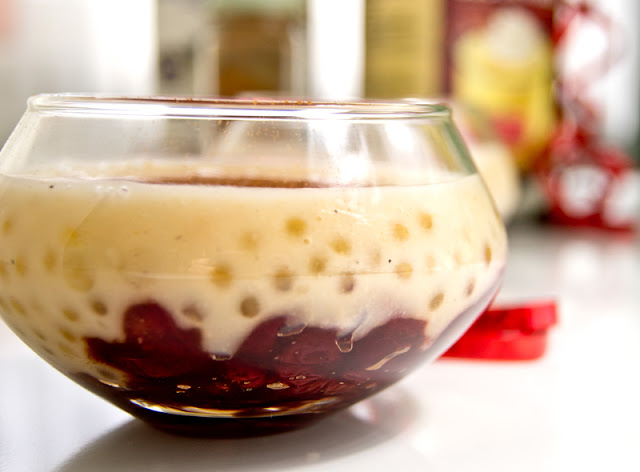
Noggy Tapioca with Spiced Cranberry Compote
(Serves 4)
For the Tapioca:
2) Whisk in the tapioca pearls, to prevent them from sticking together, and let the tapioca cook for 15-17 minutes. The pearls should be less opaque, and the mixture will be thicker.
3) While the tapioca is cooking, in a separate saucepan combine the cranberries, 1/2 cup of water, coconut sugar and allspice. Cook over medium-low heat, until the cranberries soften and the mixture reaches the consistency of fruit preserves. Remove from heat and allow to cool slightly.
4) Once the tapioca has finished the initial cooking, whisk in the remaining Coconut Nog and cook for an additional 5-7 minutes, stirring occasionally.
5) Remove the tapioca from the heat and allow to cool for approx. 5 minutes.
 6) In your desired serving glasses, spoon a layer of the cranberry compote, and fill the rest of the glass with tapioca.
7) Garnish with a sprinkle of cinnamon or a dollop of cranberry compote and set the glasses in the refrigerator to chill and set for 2 hours or overnight.
8) Serve and ENJOY!
*To add an extra "kick" for the adult set, reduce the cooking water by 1/4 cup, and use 1 cup of the Coconut Nog for cooking; add 1/4 cup of rum to the coconut nog added during the last 5 minutes of cooking. You could also sub out 1/4 cup of rum for 1/4 cup of water, but some of the "kick" will boil away during the initial cooking.
Buone Feste a Tutti
xoxoxo
1. I think I can make it seven more days.
2. With wine.
3. At the time of this post, anyway.
Read more ...
It's like the Holidays in a glass.

It's also lovely and a snap to prepare - with few ingredients - which could be quite a welcome reprieve from a day spent preparing a grand holiday feast.
And... if, in the "excitement" of the holidays a dessert was forgotten or you need a last minute treat to bring to a holiday gathering, you don't necessarily have to revert to store-bought. All you need is about 20 minutes of cooking time and a couple hours of refrigeration, which can conveniently coincide with holiday gift wrapping, last-minute shopping/errands, a decompressing holiday bubble bath2...
If you don't have the 3-4 ingredients handy, it's only the 24th of December3 - the stores are still open.

Noggy Tapioca with Spiced Cranberry Compote
(Serves 4)
For the Tapioca:
- 20g (6 Tbsp) Small Tapioca Pearls (I used Let's Do... Organic®)
- 3 Cups Filtered Water*
- 2 Cups So Delicious® Coconut Nog
- 7oz () Fresh Cranberries
- 1/2 Cup Filtered Water
- 20g (2 Tbsp) Coconut Sugar
- 1/2 tsp Allspice
2) Whisk in the tapioca pearls, to prevent them from sticking together, and let the tapioca cook for 15-17 minutes. The pearls should be less opaque, and the mixture will be thicker.
3) While the tapioca is cooking, in a separate saucepan combine the cranberries, 1/2 cup of water, coconut sugar and allspice. Cook over medium-low heat, until the cranberries soften and the mixture reaches the consistency of fruit preserves. Remove from heat and allow to cool slightly.
4) Once the tapioca has finished the initial cooking, whisk in the remaining Coconut Nog and cook for an additional 5-7 minutes, stirring occasionally.
5) Remove the tapioca from the heat and allow to cool for approx. 5 minutes.
 6) In your desired serving glasses, spoon a layer of the cranberry compote, and fill the rest of the glass with tapioca.
7) Garnish with a sprinkle of cinnamon or a dollop of cranberry compote and set the glasses in the refrigerator to chill and set for 2 hours or overnight.
8) Serve and ENJOY!
*To add an extra "kick" for the adult set, reduce the cooking water by 1/4 cup, and use 1 cup of the Coconut Nog for cooking; add 1/4 cup of rum to the coconut nog added during the last 5 minutes of cooking. You could also sub out 1/4 cup of rum for 1/4 cup of water, but some of the "kick" will boil away during the initial cooking.
Buone Feste a Tutti
xoxoxo
1. I think I can make it seven more days.
2. With wine.
3. At the time of this post, anyway.