Showing posts with label soy free. Show all posts

24 January 2020

Tuscan Bean Garden Soup

I'm finally back with a new recipe -  hearty, savory, warming soup, perfect for a chilly night1 or just a regular old soup craving.

So, I'd been really wanting a creamy Tuscan-style bean soup, like the one my father used to bring home from the Italian banquet hall when we were little, but nothing I'd found could match up. That soup was, I'm fairly certain, not vegan2. Well, this one I'm about to share is vegan3 , organic4, and all those other wonderful things for which this blog is known. Garlic and rosemary add the classic Tuscan flavors to the (slight) twist on a classic Tuscan white bean soup.


To be honest, I'm not much of a soup-preparer5. I used to be, and I'd very much like to be again. I even own a Crock-Pot to make things more convenient, but I lack whatever it is that makes one actually prepare a soup. I don't know what happened because I feel like. once upon a time, I was making soup constantly6. Well, this soup has has returned me to my soup-preparing days7. I love it so much, I want to make it all of the time!

When I cook meals/savory dishes, I tend to cook by instinct and save the weighing and measuring for baking. So, I ended up making this soup twice, measuring what I was doing the second time, just so I could share it.

As I mentioned above, (nearly) all of the ingredients I used in the soup are organic - the bouillon includes some non-organic maltodextrin - but whether you choose to make it organic is clearly optional. Also, it's soup; you could probably follow the recipe fairly loosely and it will still be delicious.  However, if you really want it to be 100% organic, leave out the bouillon; although most ingredients in the bouillon are organic, there are a couple that aren't.8

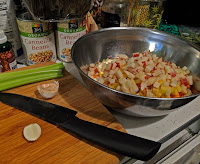
This recipe includes a few more veggies than a traditional Tuscan white bean soup, hence the "garden". I chose to dice all of the veggies for this version because I wanted a smoother/less-chunky consistency. The prep was a bit more time-consuming, but the cook-time decreased, so it evened out.9 I also wanted the potatoes to break down a bit to release their starches into the soup. Feel free to chop bigger pieces, if you prefer, but prepare for a possible difference in consistency.


I highly recommend preparing the pasta separately and adding it to individual bowls upon serving, to keep the pasta from soaking up the soup liquid and becoming bloated and soggy.10 If you have leftovers the Barilla GF pasta will re-heat pretty well. Simply add it directly to the soup when reheating. This soup is even better the next day, to be perfectly honest.


Tuscan Bean Garden Soup
(serves 4-5)
Prep Time: 30mins            Cook Time:25mins

Ingredients
  • 3-4 medium Carrots (diced)
  • 4 stalks Celery (diced)
  • 4oz Crimini Mushrooms (diced)
  • 3 medium yellow or red potatoes (diced)
  • 1/2 Large Sweet Onion, or 1 small, (diced)
  • 4-5 Cloves of garlic (diced)
  • 4ish handfuls of raw Baby Spinach (rough chopped)
  • 2  15oz (or 15.5oz) cans of White Canellini or White Northern Beans
  • 2-3 Sprigs of fresh Rosemary leaves (chopped).
  • 1/2 Cup Extra Virgin Olive Oil
  • 1 Edward & Sons Not-Chikn Bouillon Cube [Optional]
  • 6 Cups of Water
  • Salt & Pepper to Taste
  • Pastina (something small) - I used 200g/half a box of Barilla* GF Ditalini that I brought back from Italy; the Barilla GF Elbows will work just fine, and can be found easily in most supermarkets.
  • Violife - or other- Parmesan (grated) for garnish [Optional]
* Barilla GF pastas contain Corn.


Preparation Instructions 

1. Add the olive oil to a 4+ Quart Pot.

2. Over medium heat saute the garlic just until it becomes aromatic and slightly soft. Take care to not overcook.

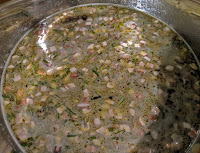
3. Still over medium heat, add the onion, celery, carrot, and potato and saute, covering briefly, until everything looks like it's starting to soften and the onions become translucent. About 5ish minutes.

4. Add the mushrooms. Continue to saute, stirring fairly frequently, until the mushrooms begin to release their water.

5. Add the 6 cups of water to the sauteed mixture. You can heat the water before adding, if you wish.

6. Once the soup begins to simmer/boil, add the bouillon (if using), then add the rosemary. Add salt and pepper to taste, once the bouillon has dissolved.

7. Reduce the heat, if necessary, and allow the soup to simmer for 20ish minutes, or until the vegetables are all quite tender.

8. While the soup is cooking, prepare the pasta and the beans. 
  • In a separate pot of boiling salted water. Cook the pasta until al-dente. Drain and set aside.
  • Drain the beans. Remove and set aside 1/2 a can of beans. Take the remaining 1.5 cans and blend them in a blender, mini blender, or food processor until mostly smooth - a few chunks are good.
9. Once the soup vegetables are tender, add the pureed beans, and the 1/2 can of whole beans. Stir until the pureed beans are well incorporated. Then add the spinach and allow to the soup to cook for 5-7 more mins or until the spinach wilts and the beans are warm.

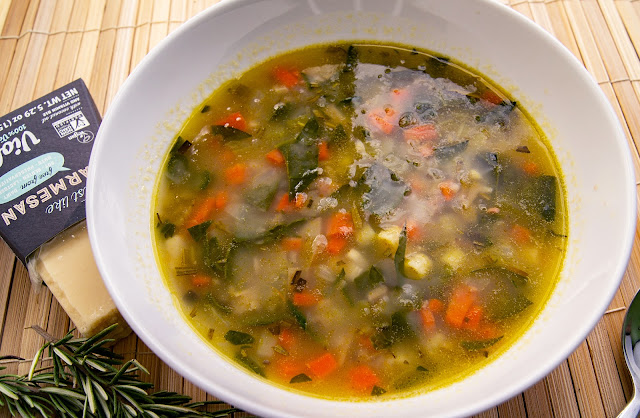
10. Serve! Add desired amount of prepared pasta to serving bowls and cover with soup.  If desired, top with some grated Violife Parmesan11, Follow Your Heart Shredded Parmesan, or any other vegan (or non-vegan) parm you desire.
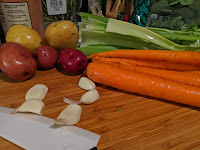

The Barilla GF Ditalini Rigati I brought from Italy. Barilla GF Elbows will work just as well.


ENJOY!


1. Not many of those around here, unfortunately... never thought I'd be saying that.
2. Chicken Stock!
3. Obviously.
4. If you so choose, no pressure.
5. Is that a word?
6. That might be an exaggeration,
7. I think.
8. As previously mentioned.
9. Win.
10. Not so nice.
11, This is what I used. Yum!


[Disclosure: This post includes an affiliate link, which means I may receive a commission, at no cost to you, if you click through and make a purchase.]
Read more ...

13 October 2013

Raw Caramel Apple Cheezecake

A couple of days ago, I posted a "Recipe Rewind", on CL's social media channels, to last year's Raw Caramel Apple recipe.
It is that time of year, after all.

The rewind/revisit sparked thoughts of the many other treats I could infuse with caramel-appley goodness. I actually sat down and made a list, each one of which I hope to be able to create and post here. For now though, I settled on the one that kept drawing my attention, and assuming you read the title of this entry before arriving at this point, there's no real surprise to be had.


So, yes, I made a scrumptiously decadent Raw Caramel Apple Cheezecake. It is a nut-based dessert, but it is not heavy or dense. The caramel apple layer also lends to less-density. In fact, I specifically made this version so that the cheezecake filling would be slightly less firm. The result was light (and delicious) and not quite so rich, so was kind of easy to eat more than one might intend.1 I should have waited until Friday, because the BF sure would have loved it.2 Thankfully, I only made a mini, two-serving cake.


While, I prefer slightly softer cheezecakes, the recipe does include options for a firmer cake. The firmer option ups the fat content3 and probably the richness, so you might to not be tempted to eat as much.4 Calorically though, it's pretty much even.5 


You can get pretty creative, in terms of pans for the two-serving cake. I used a mini-loaf mold. Other similarly-sized options are: a 4" ramekin,


Notes:
- When making a small/two-serving cake, I've found the mini-blender to be the most useful. If you don't have access to a mini blender, I'd suggest at least doubling the recipe; sometimes standard blenders have difficulties thoroughly blending small amounts of ingredients.
-The blending blade shaft can get quite hot, if used continuously for too long. This won't affect the final product at all, but it can get hot enough to begin to denature the enzymes of the food touching it, which could affect the "rawness" of the cake. One solution to this is to use the 'pulse' feature of your blender, until things are mostly blended and broken down, and then blend continuously to achieve the smooth/creamy consistency.
- For a "Full-sized" cheezecake (as opposed to Cucina Libera-sized), triple the recipe, and use a 7" springform pan.
- 2 teaspoons of coconut oil in the filling yields the less-firm CL cake. For a firmer cake, use 3-4 teaspoons of oil depending on preference. You could even add up to 5 teaspoons, if you prefer a denser, richer cake.

Important! Before you begin, make sure all ingredients are at room temp, so that when you add the coconut oil at various stages, it blends and emulsifies, instead of solidifying into little oily crystals throughout your mixture. Everything should be soaked at room temp, so this shouldn't be an issue, but just a little heads-up.


Raw Caramel Apple Cheezecake
(serves 2)

For the Caramel:
  • 8-9 Medium Pitted Dates (I used Deglet Noor; soaked overnight**)
  • Pinch of Sea Salt
  • Scant 1/2 tsp Virgin Coconut Oil
  • Dash of  Vanilla Extract or few Vanilla Seeds (optional)
For the Filling:
  • 3/4 Cup (85g) Raw Cashew Pieces (weighed prior to soaking; soaked overnight*)
  • 2-4 Tbsp Date Syrup (from the soaked dates; see below)
  • 1/2 Cup Diced Apple
  • 1/4 Cup Filtered Water
  • 2-4 tsp (9-19g) Virgin Coconut Oil (warmed gently to liquid)
  • 1 Tbsp Lemon Juice
  • 1/2 tsp Vanilla Extract OR seeds from 1/3 Vanilla Pod
For the Crust:
  • 1/8 Cup (14g) Raw Almonds (I used sprouted almonds)
  • 3 Tbsp (14g) Sprouted Buckwheat Groats OR 3 Tbsp (14g) Shredded Coconut OR 2 Tbsp (14g) Raw (GF) Oat Groats
  • 1/4 tsp Ground Cinnamon
  • Generous pinch of Sea Salt
  • 1-3 Medium Dates (depending on how sweet you prefer your crust)
  • 1/2 tsp Virgin Coconut Oil 
* Soak Cashew Pieces for 8 hours or overnight, in enough filtered water that they are completely covered. Drain and discard the soaking water.
**Pre-soak Dates, in 1/2 Cup of filtered water, for 20-30 minutes to loosen the skin; carefully peel the dates and return them to the soaking water. Continue soaking for 8 hours or overnight


1. Combine the dry ingredients for the crust in a clean, dry mini-blender or high-powered blender. Pulse until the almonds are well chopped and the mixture is the consistency of a coarse flour.

2. Add the dates and the coconut oil to the dry mixture and blend until the dates are chopped and the mixture begins to stick together in a sort-of "dough' ball.

3. Press the crust evenly into the bottom of your desired pan/mold. It should be approx. 1/4 inch thickness. Set aside while you prepare the caramel and the filling.

4. The dates should be soft and have formed a syrup. Leaving the dates behind, remove 2-4 Tbsp of the date syrup. Set the syrup aside.

5. Using a clean mini blender or a high-powered blender, blend the soaked dates (including any remaining liquid/syrup) sea salt, coconut oil, and vanilla (if using) until the mixture is smooth... you know, like caramel. Set the caramel aside.

6. Into a mini-blender, using the chopping attachment, or a high-powered blender, add the drained cashews, the syrup from step #1,  lemon juice, vanilla, and 1 tablespoon of filtered water. Begin blending, adding as little water as necessary, one tablespoon at a time, to get the mixture to a smooth, creamy. Once the filling is blended and smooth, it's time to assemble.

7. Get your pan with the set crust. Directly on top of the crust, layer the chopped apples to about 1/2 to 2/3 inch thickness; keep some apples aside to top the cheezecake.
Spoon about 3/4 of the caramel over the apples, allowing it to mix in with the apples a bit and making sure it is spread evenly to the edges.
Pour/spoon all of the cashew filling over the apples, and spread it evenly to the edges of the pan/mold.
Use some/all of the remaining apples and caramel to garnish the top of your cheesecake.

8. Allow the cheezecake to set in the refrigerator for at least 2 hours before serving. A larger cake should be allowed to set from 4-8 hours. I know it's difficult to wait, but the time is important to allow the cake to set, firm, and for the flavours to develop and meld.
OR you can opt for what I did: I froze my little cake, and then allowed it to thaw in the fridge overnight. The texture and consistency turned out really well.

ENJOY!


1. It might be the healthier, raw-food version, but it's far from a low-calorie treat. Sorry :-( 
2. Yeah, that would be "Sorry" #2
3. All good fats, of course.
4. In case you think that's a good thing. 
5. Sorry to burst your bubble (if you were excited about endnote 4). I guess we're up to "Sorry" #3?
Read more ...

21 July 2013

Cinnamon Crisps

It's been a long time...

There's no dramatic or even really interesting story behind my blogging absence. If you follow any of my social networking thingamabobs, you'll gather I've been alive and well. I'm sitting here writing because I wanted to post a recipe, so I decided there's no point in derailing the post with an explanation other than, LIFE.
I gratefully appreciate all of you still out there following, reading, and discovering.
A couple of months ago, I stumbled across a very intriguing cracker/cracker crisp in a local Whole Foods. I'm not quite sure how it even happened, as I never stop in the cracker aisle, and the product was hiding down on the bottom shelf - far from a well-marketed, eye-catching, eye-level placement. 1
At $7 a (smallish) bag, I was hesitant, but I was too curious about a gluten free, grain free, vegan cracker - or more appropriately, crisp.2 Ten minutes later I was strolling out with those $7 crisps clutched in my hand. Again, being too curious, I busted open that bag before I even started the car.3
Yum.
The bag did manage to reach the house, but once there, the bf quickly helped to polish off the rest of the crisps. Seeing the scanty cinnamon-crumb remains at the bottom of the empty bag was mildly heartbreaking. I knew full well there was no way I was going to keep myself/us in crisps at their going rate, so I flipped over the bag to take another inventory of the ingredients. Well, well... it just so happened that nearly every ingredient was a staple in my pantry.

I winged it. The first batch came out perfect4, although I needed to roll them just a bit thinner.5 I took care of that the second time round, and this is what happened...


I went for the cinnamon version first, which I think is my favourite, using coconut palm sugar as the sweetener. I've since made rosemary herb, plain sea salt, and cheezey versions. Once you have the base for the cracker crisp, you can get crazy creative. The bf said that my cinnamon crisps are not as sweet as the store-bought,6 which is totally fine with me. If you'd like them sweeter, add a bit more sweetener to the cinnamon-topping and/or add a bit of sweetener to the dough.

Up close and personal*
*and now my devious, super-villain mind has this song stuck in it.

Grain Free Cinnamon Crisps

(makes 40-50 crisps)
  • 3/4 Cup (56g) Almond Flour
  • 1/4 Cup (30g) Garbanzo Flour
  • 2 Tbsp (15g) Ground Flax
  • 1 1/2 Tbsp (10g) Psyllium Husk
  • 1 tsp (4g) Extra Virgin Olive Oil 
  • 1/8 tsp Sea Salt
  • 1/4 Cup Filtered Water
  • 1 heaping Tbsp (12g) Coconut Palm Sugar, [or your preferred granulated sugar]
  • 1/2 tsp Ground Cinnamon
  • Parchment paper
Oven 275F/135C
 
1) Combine coconut sugar and cinnamon and set aside.

2) Line a rectangular baking sheet or shallow pan with parchment paper.

3) In a mixing bowl, combine remaining dry ingredients.

4) Add water and olive oil to dry ingredients. Mix well. Once the dough begins to come together, use your hands to knead the dough into a smooth ball.

5) Turn the dough onto the parchment-lined pan, and gently begin to press out the dough into a flat rectangular shape.

6) Cover the dough with another sheet of parchment paper, and roll out to approximately 2mm thickness (thicker will lead to a denser, somewhat tougher cracker). As you roll, even out edges with a pizza cutter or sharp knife. It may be necessary to periodically reposition the top piece of parchment.
*If your pan has edges, you can set the parchment on a table or other flat surface, taking care to roll out the dough within the dimensions of the pan.

7) Once the dough is rolled out to a uniform thickness, sprinkle the cinnamon sugar mixture over the top, using your fingers or the back of a spoon to evenly distribute the mixture all the way to the edges.

8) Bake the crisps for 8-10 minutes, then remove the pan to slice the dough into approximately 1 1/2 inch square crackers. I used a pizza cutter for ease, but a sharp knife should also suffice. Return the crisps to the oven for 10-12 more minutes or until crisp and the cinnamon sugar has mostly caramelized.

Allow the crisps to cool for at least 10-15 minutes. Store them in an airtight container, if they last that long.

ENJOY!


1. Might want to reconsider that, WF. 
2. I admit, the word "skinny"in the label drew me in - diabolically clever marketing!
3. And came really close to becoming one of those annoying people that takes 45 minutes to pull out of a parking space. You know the ones; they're busy texting, checking their messages, putting on makeup, changing their clothes, brushing their teeth, bidding on Ebay, blogging...
4. I'm an evil genius, in case you didn't know. I even happen to have an assessment attesting to this from when I was four years old. Seriously.
5. Fine. Almost perfect.
6. Not particularly surprising.
Read more ...

24 December 2012

Noggy Tapioca with Spiced Cranberry Compote

I promise not to make any more recipes in a glass for the rest of the year.1 I just want to sneak this "last" one in - I couldn't bear not to share it.

It's like the Holidays in a glass.


It's also lovely and a snap to prepare - with few ingredients - which could be quite a welcome reprieve from a day spent preparing a grand holiday feast.

And... if, in the "excitement" of the holidays a dessert was forgotten or you need a last minute treat to bring to a holiday gathering, you don't necessarily have to revert to store-bought. All you need is about 20 minutes of cooking time and a couple hours of refrigeration, which can conveniently coincide with holiday gift wrapping, last-minute shopping/errands, a decompressing holiday bubble bath2...

If you don't have the 3-4 ingredients handy, it's only the 24th of December3 - the stores are still open.


Noggy Tapioca with Spiced Cranberry Compote
(Serves 4)


For the Tapioca:

  • 20g (6 Tbsp) Small Tapioca Pearls (I used Let's Do... Organic®)
  • 3 Cups Filtered Water*
  • 2 Cups So Delicious® Coconut Nog
For the Cranberry Compote:
  • 7oz () Fresh Cranberries
  • 1/2 Cup Filtered Water
  • 20g (2 Tbsp) Coconut Sugar
  • 1/2 tsp Allspice
  •  
1) In a medium saucepan, bring the 3 Cups of water and 3/4 Cup of Coconut Nog to a boil.

2) Whisk in the tapioca pearls, to prevent them from sticking together, and let the tapioca cook for 15-17 minutes. The pearls should be less opaque, and the mixture will be thicker.

3) While the tapioca is cooking, in a separate saucepan combine the cranberries, 1/2 cup of water, coconut sugar and allspice. Cook over medium-low heat, until the cranberries soften and the mixture reaches the consistency of fruit preserves. Remove from heat and allow to cool slightly.

4) Once the tapioca has finished the initial cooking, whisk in the remaining Coconut Nog and cook for an additional 5-7 minutes, stirring occasionally.

5) Remove the tapioca from the heat and allow to cool for approx. 5 minutes.

6) In your desired serving glasses, spoon a layer of the cranberry compote, and fill the rest of the glass with tapioca.

7) Garnish with a sprinkle of cinnamon or a dollop of cranberry compote and set the glasses in the refrigerator to chill and set for 2 hours or overnight.

8) Serve and ENJOY!


*To add an extra "kick" for the adult set, reduce the cooking water by 1/4 cup, and use 1 cup of the Coconut Nog for cooking; add 1/4 cup of rum to the coconut nog added during the last 5 minutes of cooking. You could also sub out 1/4 cup of rum for 1/4 cup of water, but some of the "kick" will boil away during the initial cooking.


Buone Feste a Tutti
xoxoxo


1. I think I can make it seven more days.
2. With wine. 
3. At the time of this post, anyway.

Read more ...

09 December 2012

VeggNog Crepes

Historically,1 crepes were the fancy, cosmopolitan cousin of the pancake -  not something we ever prepared at home. I have wonderful memories of my mother taking us to the Oakbrook Mall, during the holidays, and getting strawberry crepes at The Magic Pan.

I haven't been to many malls here, which is odd because L.A. seems to be made of strip malls, but I did somehow end up at an outdoor mall, which vaguely reminded me of Oakbrook. They were even shooting this foam/bubble "snow" up from the top of the building to enhance the holiday season theme. It was weird but cool at the same time. And I can't believe I'm about to say that I sort of like the idea of a peaceful snowfall around the holidays. Of course, I greatly dislike trudging out in the cold, grey, salty sludge into which it transforms...and slipping on the ice underneath it... and scraping off my windshield... but I digress...

The point is that the trip to that outdoor mall conjured up my memories of Oakbrook... and crepes.  When I returned home to find my carton of vegan "nog" staring at me from the fridge, it practically begged me to be incorporated into a crepe. A gluten free, vegan crepe, naturally.

 
These light, slightly sweet crepes have a delicate flavor that is complemented well by cinnamon and nutmeg flavors and a frugal use of condiments. Of course, you could also slather on some blueberry jam (ala the BF), and be quite happy. I was told these tasted just like the non-vegan crepes his mother used to make, back in France. The last batch I made yielded 10, and he ate all of them.


VeggNog Crepes
(makes 8-10 crepes)
  • 100g (3/4 Cup) Sorghum Flour
  • 30g (1/4 Cup) Tapioca Flour
  • 3/4 Cup So Delicious® Coconut Nog
  • 1/2 Cup Filtered Water
  • 30g (2 Tbsp) Earth Balance® Coconut Spread (melted)
Optional Garnish:
  • 30g (1/4 Cup) Toasted, shelled Pistachios
  • 10g (1 Tbsp) Coconut Palm Sugar (Turbinado, Sucanat, etc... can easily be subbed)
  • 1/8 tsp Ground Nutmeg

1. Prepare the pistachio garnish by processing all ingredients in a food processor or mini blender, until the pistachios are well-chopped. Set aside.

2. In a mixing bowl, whisk together all crepe ingredients, until batter is smooth.

3. Lightly oil a non-stick (ceramic is best) pan/griddle or a seasoned, cast iron skillet, and heat over medium heat.

4. Using 3 Tbsp of batter per crepe, prepare crepes by adding batter to the pan and quickly swirling the pan to spread the batter into an thin, even disc.

5. Cook each crepe for 4-6 minutes, flipping once midway through cooking. Crepes should not brown.

6. Serve with Pistachio Garnish... OR powdered sugar, coconut whipped cream, spiced cranberries, candied pecans, or any other garnish that strikes your fancy!

Enjoy!!


1. In our household, anyway.
Read more ...

14 November 2012

Pumpkin Custard Layered Spice Cake... in a glass.

I admit. The title is nothing more than a poor (and poorly disguised) attempt at not calling this recipe a parfait.
As I was preparing to write, I looked back over the last two recipes, and despite the fact that this one is truly more of a parfait than the previous two could ever hope to be, I've definitely got a recipe theme1 running here: Pudding/Custard treats layered in a glass with some sort of crust/crumble/cookie/cake.

I did write up the Dragon Coconut recipe as a pie... yeah, in a glass, but still. Looking back, I really don't know why I called the Sunbutter Cup recipe a parfait; architecturally, it's much more similar to a pie: crust, filling, chocolatey shell topping. Now I feel like I've used my allotment of the word parfait, and I shouldn't be following parfait recipe with parfait recipe.2 Instead of maybe saving it to post later, after a couple more recipes have nudged the Cucina Libera parfait idea out of recent consciousness,3 I'm sitting here trying to figure out how to rename the recipe.4
It's too bad because this recipe is an honest-to-goodness parfait. It's even layered with cake and everything!


We all know that as soon as Autumn rolls around, pumpkin-anything is ubiquitous, and I'm certainly not immune to the charms of the globular, orange gourd.5 So, I present (another) pumpkin recipe, just in time for the holidays.think this is a neat/fancy alternative to the old pumpkin pie standard.6 In fact, I will be making these for our holiday celebration, as requested by my brother, who exclaimed that "they taste just like pumpkin pie with whipped cream!"7

I made somewhat larger ones for the "dress rehearsal", but I think I'm going to use tall shot glasses for the "performance".
For a LOWER SUGARS option, sub out the dates for 30-40 drops of Liquid Stevia; the custard may be a little "looser" but just as delicious.


Pumpkin Custard Layered Spice Cake... in a glass
(Serves 6-8)

For the Spice Cake:
  • 240g (2 Cups) Gluten Free All Purpose Flour OR 60g (1/2 Cup) Buckwheat Flour + 60g (1/2 Cup) Sorghum Flour + 120g (1 Cup) Tapioca Flour
  • 60g (6 Tbsp) Coconut Palm Sugar (feel free to sub Turbinado, Sucanat, etc...)
  • 2 tsp Baking Soda
  • 2 tsp Cream of Tartar
  • 1/2 tsp Cinnamon
  • 1/2 tsp Nutmeg
  • 1/4 tsp Ground Ginger
  • 1/4 tsp Ground Cloves
  • 2 tsp Vanilla Extract
  • 2 Chia Eggs (2T ground chia + 6T filtered water)
  • 45g (3 Tbsp) Extra Virgin Olive Oil
  • 60g (1/4 Cup) Unsweetened Applesauce
  • 1/4 Cup Unsweetened Coconut Milk (I used So Delicious®; other nut/hemp/oat milks will also work - rice will not)
  • 2 tsp Apple Cider Vinegar 
For the Pumpkin Custard:
  • 30oz Pumpkin Puree - home-prepared or canned (I found Trader Joe's Organic Pumpkin to be most similar - in consistency/taste - to home-prepared pumpkin puree)
  • 6 Pitted Dates (soaked and peeled/skinned)
  • 1/4 Cup Unsweetened Coconut Milk (brought to room temp - again, I used So Delicious®, and again, other "mylks" will also work fine.)
  • 2 tsp Pumpkin Pie Spice (or combine 3/4tsp Cinnamon, 1/2tsp Nutmeg, 1/2tsp Ground Ginger, 1/4 tsp Ground Cloves, Pinch of Allspice)
  • 1 Tbsp Virgin Coconut Oil (warmed to liquid)
For the "Whipped Cream":
  • 2 cans of Full Fat Coconut Milk (chilled in the fridge overnight) 
  • 1 tsp Vanilla Extract
  • 30 drops Liquid Stevia
Oven: 325F/160C
Bake Time: 25-30 min
Chill Time: At least 2 hours, or overnight.

**In order for the coconut cream to separate well, the fat content should be 12g or higher per serving; I've found Thai Kitchen brand to work well. 

Lightly oil two 8" round cake pans with coconut oil. Set aside (away from the oven).

[Prepare the Spice Cake]
1) Prepare the chia egg, and set aside.

2) In a mixing bowl, combine all of the dry Spice Cake ingredients. Mix well.

3) In a separate glass, stir the ACV into the coconut milk, until the mixture begins to coagulate.

4) Add the chia eggs, ACV/coconut milk mixture, and the remaining wet ingredients to the dry mixture. Mix well.

5) Distribute the batter evenly between the two cake pans, and use a spoon or spatula to spread it evenly to the edges. The pans should end up being approximately 1/3 of the way full - we want a thin layer cake.

6) Bake at 325F/160C for 25-27 minutes. The goal is to  very (very) slightly overbake the cake. Allow the cake to cool in the pans, when ready.

While the cake is baking...
[Prepare the Pumpkin Custard]

7) Make sure all ingredients are room temp before starting; this is important! Combine all the custard ingredients in a blender, and blend until smooth. Set aside.

Once the cake is ready and cooling...
[Prepare the Coconut Whipped Creme]

8) Carefully scoop the solid coconut cream, leaving the clear liquid behind.

9) Add the coconut cream, vanilla, and stevia to a (preferably glass, chilled) mixing bowl. Whip together, using an electric had mixer, until the mixture becomes fluffy and whipped-cream-like.

[Assemble!]

I used a biscuit cutter, appropriately-sized to fit my glasses, to cut even disks out of the cakes. Any circular cutter will work.
Sprinkle a bit of coconut sugar at the bottom of each glass (this is optional), then begin layering the parfait:
Cake|Custard|Coconut Cream [repeat].
I wanted my top layer to be Pumpkin Custard, but you can certainly choose to have a top layer of Coconut Cream. Garnish with a sprinkle of pumpkin pie spice, a dollop of Coconut Cream, or both!

Chill the parfaits for at least 2 hours or overnight.

Enjoy!


1. Albeit unintentional. Honestly!
2. Weirdo.
3. Or just saying, "Screw it; it's my blog. Here, have another an actual parfait recipe."
4. See #2 above.
5. I can't resist creating a recipe... at least one..., like the Pumpkin Spice Muffin recipe I shared last year at this time.
6. Before anyone takes offense, I have absolutely nothing against pumpkin pie. I'm really quite fond of it.
7. Yes, he's been recruited as a taste-tester/test subject. "Gooble Gobble...!"
Read more ...

03 November 2012

Sunbutter Cup Parfait

"Sunbutter", yes... as in sunflower seed butter. Again, yes. I know; I'm not supposed to have sunflower seeds, as dictated by my most recent IgG/IgA/IgE panel, but you know what?
Well, I'll tell you.
I have been careful about avoiding them for the most part, and I don't feel at all poorly afterwards, if I do slip up and eat a few. Therefore, I feel I can rotate them in on occasion with no ill effects. It's also been proven throughout my periodic food panel testing1 that just as sure as new sensitivities might appear2 other foods that previously registered a reaction no longer do so.

I do believe food rotation is important, although it's hardly something I'm good about practicing, which is why I rarely/never discuss it.3 I notice that when some food suddenly show a mild antibody reaction, it's usually something that I've been eating consistently and often.
Now, here's a little story I'd like to tell... My very first test showed an antibody against bananas.4 I thought that was the weirdest thing ever. I mean, seriously; I was eating bananas every day. I never felt bad or broke out in hives or anything. I really liked bananas too, so I was pretty bummed about not being able to eat them anymore. I cut them out for years.

When I finally got fed up over rigidly avoiding every single thing on my "reactive" list, the first things I let up on were the foods with lower reactive scores. I didn't go back to eating bananas everyday, I just stopped going out of my way to avoid them, and if I wanted one, I'd have one. Bananas have never again registered on any subsequent food sensitivity panel.
The End.

I won't waste time apologizing for the ramblings,5 because well, you're all used to this by now, right? And it's all related to the post/recipe but not because there are any bananas to be found in this recipe.


This creation was inspired in part by peanut (or almond or sunflower seed) butter cup candies and in other part by the peanut butter parfait at Native Foods Cafe. Native Foods is a vegan restaurant that makes me happy; they clearly indicate gluten-free menu items, offer quinoa, and allow for any substitutions. Their parfait is a peanut butter mousse consisting of peanut butter (obviously), silken tofu, and sweetened (a bit heavy-handedly6) with agave, layered between their crumbled Boogie Bar (a kind of chocolate-chippy, and not GF, banana bread), a topping of chocolate chips. As yummy as it sounds, the entire dessert would be a disaster for me... even more so as my system has had some recent disagreements with silken tofu.7

I dreamt up a non-disastrous, unrefined/unprocessed alternative with a chocolate shell topping that's fun to crack open, and gives it a little more of the candy cup feel. I chose to use one of my sunflower seed "special occasion passes" on this. Definitely feel free to sub other nut or seed butters, if your diet permits.


Sunbutter Cup Parfait
(serves two)

Ingredients:
 
For the Mousse:
  • Flesh of 2 young coconuts - room temp (save the water!)
  • 3 Tbsp (48g) Sunflower Seed Butter (I like MaraNatha: only sunflower seeds and salt!)
  • 15-20 drops of Liquid Stevia (not into stevia? sub 5-6 (40g) Pitted Dates - soaked)
  • Scant 1/8 tsp Sea Salt
For the Chocolate Shell Topping:
  • 2 Tbsp (10g) Unsweetened Cocoa Powder
  • 15 drops of Liquid Stevia (or sub 2T (10g) of Coconut Sugar dissolved in 1tsp of boiling water)
  • 1/4 Cup (55g) Virgin Coconut Oil (warmed to liquid)
  • 1/2 tsp Vanilla Extract
  • Pinch Sea Salt
For the Crumble:
*For a quick, no-bake crumble, combine 1/2 Cup of finely shredded coconut, 2 pitted dates, 1/2 Tbsp coconut oil, 1/4 tsp vanilla, and a pinch of salt in a food processor or mini-blender. Process until the mixture is uniform and crumbly, and lightly press into serving bowl(s).

Directions:
1. Prepare the Coconut Cream Shortbread Cookies as directed, and set aside to cool, OR prepare the quick, no-bake crumble option.

2. In a small bowl, combine all ingredients for the Chocolate Shell Topping. Set aside. Do not allow the mixture to chill or solidify.

3. In a high-powered blender begin to process the young coconut meat, until it reaches a smooth, pudding-like consistency. This requires some patience.  If the coconut meat is firmer, gradually add some of the coconut water, 1 Tbsp at a time, until the coconut begins to blend. If coconut water is needed, it's important to add the least amount possible to get the coconut meat to blend; too much will lead to a loose/runny mousse.

4. Once the coconut meat is blended and smooth, add the sunflower seed butter, stevia (or dates), and sea salt. Blend until smooth and well combined.

5. Assemble the Parfaits by crumbling the Coconut Cream Shortbread Cookies (or lightly press the no-bake crumble) into two serving bowls/ramekins/baking dishes (I used two 2-Cup Pyrex bowls). Evenly divide the sunflower seed butter mousse between the bowls, layered over the crumbles. Then pour the chocolate topping evenly over the mousse, so that it covers the entire top of each bowl.

6. Allow the parfaits to chill/set in the refrigerator for at least one hour or over night.

7. Enjoy!!


1. Fine. I've had three done in the last 18 or so years, but that counts as periodic.
2. You know, like sunflower seeds.
3. This will
4. Amongst SO MANY other things.
5. Although, I think I just did.
6. Yes; I did sneak a taste of the BFFs
7. There's a footnote re: my dietary approach to soy on the About Me page, if you're interested.

Read more ...

23 September 2012

Ch-ch-ch-ch-anges... New Experiences... Dragon Fruit

After months of promises of new posts, I've actually settled down to write (and share a recipe!) with something of a theme in mind.
In the midst of international travel, a cross-country move, unpacking an entire life, settling in... my fantasies of keeping up with posts proved far more ambitious than I envisioned. Now that the dust has (mostly) cleared, time has carried us to the change of the seasons.1

So, yesterday was the first day of Fall. 2 On the last day of Summer, I walked in to my new, and dangerously tempting, neighborhood natural foods market. As usual, I was running in to buy ONE item; naturally, I walked out with many more. Back to the point, As soon as the doors slid open, I was greeted by a display of vibrantly colored Dragon Fruit. Green and Pink happen to be my favorite color complements 3, so I was immediately drawn to this pile of lovely-looking fruit.

I'd never eaten a dragon fruit before, and I can't recall ever seeing them in such ample display.

Typically, I'd see five or six off to the side where the other exotic fruit live, but this vibrant display of pink and green spiky fruits was almost mesmerizing. The store's clever marketing tactic worked it's magic. Without thinking, I picked one to put in my basket. I hadn't completely succumbed, however; despite being on sale, their price tag could lead to a costly haul, if uncontrolled, and my pocketbook has more of a hold over me than any fancy fruit ever could.   
The Fruity Spoils - not in the rotting sense.

New home. New life. New season. New fruit. It's interestingly symbolic. 4

I unpacked my two fancy new fruits, and not wanting to just eat them, I decided they needed to me transformed into a recipe befitting their uniqueness. Of course, not having ever tasted a dragon fruit before, I needed to crack... slice... one open, in order to understand the flavor before I could get to work.
W-O-W. Bright, BRIGHT magenta-coloured flesh; delicate, slightly-sweet flavor - one that could easily be overpowered by too many ingredients. I had to keep it simple.5
Not a problem because...well... being the proprietor of a food and cooking blog, I probably shouldn't admit6 that I don't do much cooking,7 when I don't have someone for whom to cook. My main culinary "test subjects"/ meal recipients are 2000 miles away8 and on tour, respectively. When left to my own devices, I tend to stick to pretty simple, 97% raw foods; it's quick and convenient.
From that tendency comes this "custard" pie recipe.
OK, so it's really not that unique of a recipe, but it does employ and retain the unique exterior color of the fruit, which, I dare say, is one of its most appealing features.

P.S. It's important to use soaked, sprouted pumpkin seeds (and other seeds/nuts, for that matter). Raw nuts and seeds contain enzyme inhibitors, which make them difficult to digest. Part of the simplicity of this recipe was due to the fact that I typically have soaked, sprouted (and dried) seeds on hand. If you don't, don't despair. Roasted pumpkin seeds are fine as well. If you prefer to stay raw, just soak the seeds in filtered water for 2-3 hours, drain the soaking water, pat them dry, and use them "damp".


Raw, Dragon Coconut Pie (Individual- (fancy) -serve)
(serves 2)

For the Pie Filling:
  • 2 Dragon Fruits (flesh scooped out)
  • 1/2 Cup Homemade Nut Mylk or Filtered Water (room temp is important!)
  • 2 tsp Ground White Chia (black is OK too, but the result will be more speckled)
  • 1 Tbsp Virgin Coconut Oil
  • 1/8 tsp Vanilla Extract (or seeds from 1/4 of a pod)
  • 1-2 Pitted Dates (optional)
For the Crust:
  • 1/3 Cup Shredded Coconut
  • 1/4 Cup (28g) Raw, soaked Pumpkin Seeds
  • 2 tsp Virgin Coconut Oil
  • 1 Pitted Date (optional)
  • Scant 1/8 tsp Sea Salt
Cook time: 0 mins

If necessary, gently warm the coconut oil, so that it becomes liquid.

Prepare the Crust.
In a mini blender, using the grinder attachment, or a food processor, process the shredded coconut, pumpkin seeds, and sea salt, until the mixture reaches a flour-like consistency. The natural oils will release, and the "flour" should clump together a bit.

When your flour is ready, add in the coconut oil, and the date (I omitted the date from this version for a not-sweet crust). Process until the ingredients are evenly distributed; the flour will clump together more - if using the date, the dough will begin to form a more solid "ball".

Evenly press the crust mixture into two glasses or small glass bowls. Set aside in the refrigerator, while you...

Prepare the Filling.
Ensure all of the ingredients are room temperature, before beginning.
In a blender, or mini-blender, combine all the ingredients (including the dates, if you're using them) and blend until smooth.

Remove the crusts from the refrigerator, and evenly divide the mixture between the two glasses. Return the completed "pies" to the fridge and allow to chill and set for at 1-2 hours.

Serve and ENJOY!


1. Yet another change.
2. As far as the calendar is concerned, anyway. I'm still VERY happily enjoying the summer-like weather here.
3. I've instantly flashed back to an advertisement from the 80s, for a product I can't remember, in which a "Valley Girl" declares, "Pink and Lime Green are the ultimate colors." ... A girl after my own heart.
4. No?
5. And keeping food simple is kinda my thing. 
6. But I will anyway.
7. As in subjecting food to chemical changes and/or:
    cook     verb (used with object) 1. to prepare(food)by the use of heat, by boiling, baking,or roasting.       2. to subject(anything)to the application of heat.
8. [sadface]

Read more ...

28 May 2012

Blueberry Cheezecake Popsicles

So this is the final week of the So Delicious® SO Much to Love Giveaway recipe contest. It's dessert week! As I mentioned a couple of posts back, I have a dessert1 recipe featured... and up for voting, starting today. It turned out to be a rather fortuitous contest scheduling arrangement, as the recipe happens to be a frosty popsicle treat - perfect for this balmy Memorial Day holiday.
Creamy, fruity, refreshing, and LOW sugar!!

VOTING HAS ENDED. THANKS FOR ALL YOUR SUPPORT!


Aaaand... here's the recipe for your Memorial (or any!) Day enjoyment. Simple. Decadent. Very low sugars - none of which are refined, of course.
Missing the "crust" element? Layer some crushed (GF/Vegan) Graham Crackers between the cheezecake and blueberry.

Holiday idea: If you're into patriotically-themed foods, a layer of strawberry could be added, for a red/white/blue look.


Blueberry Cheezecake Popsicles
(makes 4)

For the Cheezecake

  • 1 (15oz) Can Full Fat Coconut Milk
  • 3/4 Cup So Delicious Original Kefir
  • 20-25 Drops of Liquid Stevia (or 5-6 Pitted Dates, if you're not into stevia)
  • 2 tsp Vanilla Extract
  • 1/8 tsp Sea Salt
For the Blueberry "Filling"
  • 2 Pints Fresh Blueberries
  • 3-4 Pitted Dates
You will also need...
  • 3oz Cups & Wooden Popsicle Sticks or
  • Popsicle Molds

Chill the can of coconut milk in the fridge overnight. This will allow the coconut cream to separate from the liquid.
Once chilled, scoop out the thick coconut cream, leaving the clear liquid behind.

Soak all of the dates in 1/4 room temperature filtered water for 10-15 minutes. If the dates are somewhat hard, they may need to be soaked a bit longer.

Blend the coconut cream, kefir, stevia (or dates, if you're using them), vanilla, and sea salt in a blender until completely smooth.
Transfer the mixture to a bowl, and set in the fridge, while you prepare the blueberry filling.

Blend the blueberries and dates in a food processor or high powered blender until the dates have been fully processed and the mixture is  smooth. Transfer the filling to a separate bowl, and chill in the fridge for 10-15 minutes.

Both mixtures should have thickened in the fridge. The blueberry filling will have developed an almost solid, jelly-like consistency - give it a quick stir, before putting the popsicles together.
Assemble the popsicles by layering the cheezecake with the blueberry filling. Start with a layer of cheezecake, followed by a layer of blueberry, and topped with another layer of cheezecake.

Gently insert the popsicle sticks - the mixture(s) will be thick enough to allow them to stand upright on their own - , and freeze the popsicles until solid.

Enjoy!


1. Naturally.
Read more ...

25 May 2012

Raw Tempura Maki Rolls

Before I adopted a vegan diet, and even before I became a vegetarian... way back when I was still a small child, I never cared for fish. It was the fishy-taste. Fishy sugo was the worst. I hated the baccalà that appeared in our sugo every Christmas eve, and you wouldn't have caught me anywhere near a plate of linguini alle vongole. Barf.

So what? Right? I've been vegan for more than half of my existence at this point. Why am I even blathering about fish/seafood?1
Nori.
One of those chlorophyll/iodine/protein-rich weeds of the sea.2 You know, the ones that, if harvested from the right sources, are a great addition to a healthy diet.

I actually ate ALL of these.
Except...the first time I tried nori, I spat it out.3 I knew it was nutritionally dense, I wanted to be able to add it to my diet, but it was just too fishy. I couldn't stomach it. Until one day, my friend convinced me to accompany her to a sushi restaurant. She knew I was vegan, but insisted I would be able to eat something. I told her I had a hard time with nori, and she insisted I would be fine.
She wasn't entirely wrong. She introduced me to inari (rice stuffed in a tofu pouch), which I thought was pretty darn cool, at the time. She also encouraged me to try an inside out roll. I was skeptical, and slightly concerned.
Surprise!
With the rice on the outside (and slathered in wasabi), the nori inside was barely detectable.

This was uber-exciting, and I proceeded to incorporate nori into my diet by way of various inside-out veggie rolls. Somehow, I must have developed a tolerance, if you will, because years and years later, I found myself enjoying sheets of roasted nori... alone. I even chew chlorella tablets and add kelp flakes to salads.4
I say tolerance because every now and again, a little too much "fish-taste" comes through, or I get a bite of salad with a high concentration of kelp flakes, and I can't handle it.
Although the complete recipe does require a bit of pre-prep, you can certainly take a few short cuts, and still turn out5 a delicious roll.


In the spirit of full disclosure, this batch was the high-raw pseudo-tempura version because I didn't want to wait to dehydrate the tempura, and I used SeaSnax Wasabi Seaweed Snacks to make the rolls. SeaSnax are roasted but they're still amazing because unlike other nori snacks, they contain NO canola oil or maltodextrins - just nori, olive oil, salt and wasabi. YUM, indeed.

These rolls are a combination of conventional and non-conventional ideas/ingredients. White rice is nutritionally empty, so it's right out. Brown rice is ok, but it's neither my favorite nor something I would make at home. I would probably have used quinoa, but I wanted to make raw rolls... raw rolls that weren't based heavily on nuts and seeds.6

I have an effective little "trick" to soften/tenderize the asparagus, without using salt/tamari/aminos... freeze it.
Yep; that's it. Easy, eh?
Simply freeze fresh asparagus spears for 1-2 days, then allow them to thaw at room temp. They end up soft(er), almost as though they've been cooked... uh... except they haven't been. It's pretty neat.

That's just what I did with these little guys. However, as I mentioned above, I didn't want to wait for the dehydrator this time, so I just tossed the tenderized asparagus with the dry tempura ingredients until they were coated. The recipe shares the full tempura directions :-)


Raw Tempura Rolls
(serves 3-4)
  • 1 head of Cauliflower
  • 2 (large) Portabella Mushroom Caps (stems removed)
  • 1 Avocado
  • 5 stalks of Asparagus (frozen, then thawed)
  • 2 Tbsp Coconut Aminos
  • Sea Salt
  • 1/2 tsp Apple Cider Vinegar (or Unseasoned Rice Vinegar, if desired)
  • 1/2 tsp Coconut Nectar (or 3-4 drops of Liquid Stevia)
  • 1/2 Cup Coconut Flakes 
  • 1/4 Cup Nutritional Yeast
  • 1/4 Cup Ground Chia or Ground Flax Seeds
  • Dehydrated nori sheets (I used SeaSnax for this batch)
  • Raw Sesame Seeds (optional)
Pre-Prep:
Cut the cauliflower head to remove the florets, then cut away the extra stems from the florets. A bit of stem is OK, but there should be very little.
Cut or crumble the florets into small pieces and add them to a food processor fitted with an S blade.
Pulse the cauliflower until it is evenly processed into a consistency resembling rice. It's fine if the "grains" are smaller; it's more important that they are mostly uniform in size. Although, it's difficult to over process, but it's still a good idea to take your time, in order to get the best consistency.

Transfer the cauliflower rice into a separate bowl. add the vinegar, coconut nectar (or stevia), and an extra 1/2 tsp of filtered water. Toss the mixture until the liquids are evenly distributed. Cover and allow the cauliflower to marinate in the refrigerator for 1-2 hours or overnight.

Slice the portabellas into thin strips. Place the strips in a shallow dish. Add the coconut aminos and gently toss to make sure the all the mushroom strips are evenly coated. Cover the dish and allow the mushrooms to marinate in the refrigerator.for 1-2 hours or overnight.

SHORT CUT #1:  Forget the marinating time, and skip straight to assembly.

Tempura:
In a food processor fitted with the S blade, combine the shredded coconut and nutritional yeast. Process for 30-60 seconds, or until the coconut reaches a finer consistency. Take care not to over-process.
Stir 2 Tbsp of the ground chia into the coconut mixture.

Add the remaining ground chia to a medium-sized bowl, and stir in 1/2 Cup of filtered water. Continue stirring as the mixture begins to thicken, to avoid lumps. Allow the mixture to sit for 5-10 minutes.

Once the chia mixture has thickened,  "batter" the asparagus spears by dipping them in the chia "egg" mixture, and then rolling them in the dry mixture, until they are evenly coated. Arrange the coated asparagus on a dehydrator tray lined with the mesh/screen fitting.
Dehydrate at 110F/ for 2-3 hours, or until the "tempura" is dry and crisp. The idea is to get the coating as dry as possible without shriveling the asparagus.

Assembly:
Cut the asparagus to match the length of your nori sheets. Since I used the SeaSnax, I cut mine smaller but allowed extra length on the pieces with the spear end, so it would stick out of the top, and look cool.

Cut the avocado in half, and slice each half into thin slices. I make the slices directly in the skin, and then carefully scoop the flesh out of the skin, so it comes out already sliced. Super-easy, and really helpful if the avocado is soft and ripe.


SHORT CUT #2:  Skip the chia "egg", and forget the dehydrating. Roll the damp, cut asparagus in the dry tempura ingredients, and add it to the roll.

Lay out one sheet of nori onto a flat surface. If you're using larger sheets, a bamboo sushi roller, would be helpful. Again, since my sheets were small, I was able to hand roll them easily. It was also not necessary to cut the rolls into pieces once they were finished.
  1. Spread an even layer of the cauliflower rice over 1/2 of the sheet (or 3/4 of the sheet if using SeaSnax). 
  2. Arrange one asparagus spear, 1-2 slices of avocado, and one slice of mushroom in the center of the rice. 
  3. Carefully roll toward the riceless edge of the nori sheet, and allow the edge of the nori to seal itself to the roll. The ingredients should have dampened the nori, making this step quite simple.
Repeat the steps above for each roll.

If using standard nori sheets, use a sharp knife to cut the roll into bite-sized pieces.
Sprinkle the rolls with sesame seeds, if desired. Serve as-is or with pickled ginger and wasabi.

Enjoy!!


1. Well, I do still find the smell pretty nauseating.
2. Aren't I clever?
3. I also have a grappa story that goes something like that.
4. Ohmygosh. Who am I??? Seriously.
5. I suppose "roll out" is more apropos here.
6. And I have to avoid sunflower seeds now anyway :-( 
Read more ...

16 May 2012

Cinnamon Roll Muffins

First, I'd like to take a moment to extend a most heartfelt THANK YOU to everyone who voted for my Apple Cinnamon Quinoa Breakfast Bake in last week's SO Much to Love recipe contest. I'm grateful and sincerely humbled by the support and effort extended by each and every one of you!
I did not offer recipes for this or next week's voting, but So Delicious did select my other recipe to be included as well. It will be featured in the final (dessert) week of voting. I will post details (and the recipe), when the voting week begins :-)

Because you are all so amazingly awesome, I would like to express my appreciation with cinnamon rolls! Well... Cinnamon Roll Muffins, to be precise.


I suspect I must have had a traditional cinnamon roll, at some point before adopting a Vegan diet; although, I honestly cannot remember. They definitely weren't a foodstuff we made/bought when I was growing up. By the time that cinnamon roll franchise began popping up in every shopping mall, I was already well into veganism.
As I write this, I'm struck by the feeling that I did try a vegan (albeit gluten-y) cinnamon roll many many years ago. If that did happen, I suspect it was probably dry and lackluster, or I'm sure would have sought out more of them.

I'm rather fond of cinnamon. I love the scent that permeates the area around those aforementioned cinnamon roll franchises - despite not being even remotely vegan-friendly. I'm certainly not alone. I don't know anyone who dislikes the scent of cinnamon.1 Studies have shown that the scent of cinnamon elicits positive, warm feelings, and other studies indicate that some people find the scents of cinnamon, vanilla and lavender sensual.2


Well, there is no lavender in these muffins, but there is a touch of vanilla and plenty of cinnamon. In addition to evoking all those lovely, warm feelings, cinnamon (when consumed) has proven to balance blood sugar levels.
Buckwheat flour gives the muffins an additional fiber and protein boost. It is is also a great source of Manganese, Magnesium, and Iron. Pretty cool for a little groat.3
With additional fiber, protein and EFAs from the chia, and MCFAs from the coconut oil, the result is a filling, nutritionally-packed muffin that you could (more) confidently serve for breakfast.

I mean, let's face it; muffins (especially store/cafe/restaurant-bought) are generally not much more than glorified, oversized cupcakes masquerading as some sort of "healthy" breakfast food option.
I certainly don't mean to slam muffins.4 They can be done right, as a once-in-awhile breakfast option... and ideally when home-made.
But let me get off this soapbox, and get down to the recipe.

Naturally, these muffins contain no refined sugars, and, although cinnamon could help balance the effect of those unrefined sugars, they can also be made free of sugars - I've included those mods below.
Part of this batch was experimentally topped with an impromptu maple glaze (as seen above). The actual intent was to add an icing.5 However, the consistency remained syrupy, as I ran out of a crucial ingredient, so glaze it remained. I went non-traditional6 and used it anyway, although I will wait until perfect it, before I post any directions for it.
Still, the sweet-toothed BFF gave it a thumbs up. I thought the muffins were delicious sans glaze.

Cinnamon Roll Muffins
(makes 6 muffins)

Batter:
  • 1/2 Cup (70g) Sorghum Flour
  • 1/2 Cup (70g) Buckwheat Flour
  • 1/2 Cup (60g) Tapioca Flour
  • 1/2 tsp Baking Soda
  • 1/2 tsp Cream of Tartar
  • 1/4 tsp Sea Salt
  • 2 Chia or Flax Eggs (2T Ground Chia or Flax + 6T Filtered Water)
  • 1/4 Cup (80g) Maple Syrup (OR 30-40 drops liquid stevia + 3T non-dairy milk)
  • 2 Tbsp Non-Dairy Milk (I used So Delicious® Unsweetened Coconut)
  • 2 Tbsp (30g) Virgin Coconut Oil (gently warmed to liquid)
  • 1 Tbsp (15g) Olive Oil
  • 1 Tbsp Vanilla Extract
  • 1/2 tsp Almond Extract (optional)
Cinnamon Paste:
  • 1/4 Cup (80g) Maple Syrup (OR 1/3 Cup [60g] Coconut Palm Sugar & omit Coconut Flour. For Sugar-free option use: 3T non-dairy milk + 20-30 drops liquid stevia)
  • 2 Tbsp (15g) Coconut Flour
  • 1 1/2 Tbsp (22g) Virgin Coconut Oil
  • 2 Tbsp Ground Cinnamon
  • 1/4 tsp Sea Salt
Oven: 350F/180C
Bake time: 25-30 minutes

Lightly coat a muffin tin with coconut oil, or line with muffin cups.

Prepare the chia/flax eggs and set aside.

In a small bowl, combine all of the ingredients for the Cinnamon Paste. Mix well, and set aside.

In a mixing bowl, whisk together all of the dry ingredients for the batter. Add the remaining wet ingredients - including the chia/flax egg - and mix well.
The resulting mixture should have a consistency somewhere between batter and dough - it should be thick and retain some shape but also still sticky and slightly "loose".


OK now for the fun part. You can swirl the cinnamon paste in however creatively you like (dollop it on to 7/8 full muffin cups, and swirl with a chopstick... whatever works for you!)
In order to get the spiral/swirl and maintain more definition between the muffin and the cinnamon, THIS is what I did:

Lay out a sheet of parchment paper.
Scoop approximately 1/2 Cup of muffin batter onto the parchment, and spread it out to approximately 6" wide; the length should be approximately the height of the muffin tin cups - more or less rectangular, but doesn't have to be perfect.
Gently and evenly spread a heaping tablespoon (or so) of Cinnamon Paste over the batter blob.
Using a (silicone/rubber-style) spatula or spoon, carefully roll the batter over onto itself to form a roll - you can use the parchment to help keep it together.
As soon as you've formed your roll, scoop, slide or plop your roll into a muffin cup. If you work quickly but carefully, you can maintain the integrity of the roll.

Bake the muffins for 25-30 minutes. Allow to cool slightly. Serve warm.

ENJOY!


1. I'd certainly be interested to know of anyone who has an aversion towards it.
2. Lavender really surprised me, to be honest.
3. Which, again, is not a grain :-)
4. Trash muffins in a muffin recipe post?? I'd never! Not to mention doing such a thing on a blog with other muffin recipes.
5. Cucina Libera-style.
6. When making non-traditional cinnamon "rolls", I suppose it does make more sense to just ditch tradition entirely.
Read more ...

07 May 2012

My recipe in So Delicious' SO Much to Love Giveaway!

Remember a couple of posts back, when I was hinting at some recipes that would "soon be on the radar"?1
Well, I'm lifting the veil of secrecy :-)


I was thrilled to be invited to participate in So Delicious' SO Much to Love Recipe Contest/Giveaway.
Over the next four weeks, So Delicious Dairy Free will be featuring a variety of recipes to vote on for a chance to win fun prizes.

Apple Cinnamon Quinoa Breakfast Bake
This first week’s contest theme is BREAKFAST. I'm more of a mix-n-go (raw protein powder, chia seeds, Green Superfood) sort, but the contest inspired me to create a hot breakfast: Apple Cinnamon Quinoa Breakfast Bake. It's the perfect weekend breakfast. No need to be tied to the stove; just toss together a few ingredients, and go hang out with your loved ones.

I could use your help though, my lovely readers, as the winner is determined by reader votes
So... please vote for my recipe in this week’s So Delicious® Dairy Free SO Much to Love Giveaway!  You’ll be entered to win daily prizes just for voting, and if my recipe gets the most votes, you’ll be entered to win a great weekly prize!  

[Voting for this recipe has ended. Thank you for all the support!!]

Want to hear the even sweeter news?? Well, each time you vote, you’re entered to win the daily prize. At the end of the week, if your favorite recipe gets the most votes, you’re in the running for a weekly prize. Every time you vote, you are also entered to win the grand prize: A weekend for two at the Red Mountain Resort in Utah.

Voting for this week begins at 9 a.m. PST on Monday, May 7 and runs through 11:59 p.m. on Sunday, May 13


Here's the recipe, if you'd like to try it out :-)

Apple Cinnamon Quinoa Breakfast Bake
(serves 2-4)
  • 1 1/2 Cups (160g) Fuji or Granny Smith Apples - cored and chopped (peeled or unpeeled, depending on preference)
  • 1 Cup (160g) Uncooked Quinoa
  • 1/3 Cup (60g) Raisins
  • 2 1/2 Cups So Delicious® Almond Plus Milk (OR So Delicious® Coconut Milk Beverage)
  • 1/2 Tbsp (7g) Coconut Oil
  • 2 tsp Ground Cinnamon
  • Pinch of Nutmeg
  • 1/8 tsp Sea Salt
  • 2-3 (20g) Pitted Dates (optional, for sweetening/add'l sweetening of the almond milk)
For the Topping:
  • Maple Cinnamon Pumpkin Seeds (see below)
  • So Delicious Vanilla Cultured Coconut Milk or Vanilla Greek-Style Cultured Coconut Milk

Oven 375F/190C

Rinse the quinoa a couple of times, and drain well.

The sweetened Almond Plus milk provided enough sweetness to the dish. However, if you prefer a bit more sweetness or are using the Unsweetened Almond Plus, blend the dates with one cup of the Almond Plus in a blender until well-combined; add to the recipe as usual.

Combine all the ingredients in a 2qt casserole dish or oven-proof bowl. Cover with foil and bake on the center rack for 45-50 minutes, or until the quinoa is tender and most of the Almond Milk has been absorbed.

Serve warm into bowls, and garnish with a dollop of So Delicious Vanilla Cultured Coconut Milk and a generous sprinkle of Maple Cinnamon Pumpkin Seeds.

Maple Cinnamon Pumpkin Seeds
  • 3/4 Cup (60g) Raw Pumpkin Seeds (Pepitas)
  • 1 Tbsp (20g) Maple Syrup
  • 1/3 tsp Ground Cinnamon
  • Scant 1/8 tsp Sea Salt
Combine all ingredients so that the pumpkin seeds are evenly coated.
Spread the seeds in a thin layer onto a baking sheet, and bake at 375F for 8-10 minutes - this can be done simultaneously during the last few minutes of the Apple Cinnamon Breakfast Bake.
Allow the seeds to cool for a few minutes, before serving; the maple syrup should have caramelized in the oven, creating a sweet, crunchy coating.

Thanks and SO much LOVE!2


1. It's OK, if you can't remember that far back :-) 
2. See what I did there?
Read more ...

25 April 2012

Raw Apple Pie Tarts

My goodness! I can't believe it has been over a week since I've posted. I suppose I've been caught up in trip planning, my girl bff's upcoming nuptials, extra teaching, summer program planning... and despite being fairly well-organized, I've still felt as though something was not quite right - missing.
Uh... yeah... THIS.
Hmph.
I haven't been in the kitchen to actually prepare a dish. A gathering had been set for this past Sunday, and I was planning on preparing some fun, chocolatey treats, the recipe of which would then find it's way to being shared here. Alas the gathering was cancelled, and the chocolatey treats were (temporarily) abandoned.1

This, however, may have been fortuitous2 because I'd been postponing another recipe... or more appropriately, I waited to share it and was then distracted by other recipes I was creating. So, this presentation is brought to you by a specifically arranged series of events/occurrences.
Enjoy.

I know. A small dessert. Why are all of the "dessert" items I make small?
Someone might say it's because I'm small. I say that small things are cute.
And I'm sure I've mentioned this before, but I've also been known to a bite or two of a sweet and then try to pass the rest to the nearest bystander (usually the BFF). Small treats eliminate that tendency.

In addition to being nut free, I'd say these tarts fall are somewhat closer to a fruit salad than a pastry. They're quite fresh and light. The crust isn't heavy. The fruit isn't overly sweet or bogged down under a thick, syrupy "glaze". I made a batch for our YTT graduation party, and despite my last-minute concerns over bringing a raw dessert, they were very well-received.

Don't be intimidated by the number of steps/prep time required. They're really not at all difficult to prepare.
Really.
I actually thought later that they would be quite nice crumbled (or smushed) over a chia pudding or raw ice cream. Although, after taking the time to put them together so nicely, it would be a shame to just smash them up. They could make a nice presentation sitting atop a scoop of raw ice cream... OR if a crumbled topping idea does sound interesting at all, you can (of course) prepare the components as directed and skip the crust pressing and assembly steps :-)


For our current purposes, however, we are going to continue with pies!3

Mini Raw Apple Tarts
(makes 12)

For the Filling
  • 3 large Granny Smith or Fuji Apples
  • 6-8 (75g) Pitted Dates
  • 1/2 Cup Filtered Water
  • 1 1/2 tsp Ground Cinnamon
  • 1/4 tsp Ground Ginger
  • dash of Nutmeg
  • 1 tsp Lemon Juice
  • pinch Sea Salt
For the Crust
  • 1 1/2 Cups (120g) Shredded Coconut
  • 5-6 (40g) Pitted Dates
  • 1 Tbsp (15g) Virgin Coconut Oil
  • 1/4 tsp Vanilla Extract (optional)
  • 1/4 tsp Sea Salt
For the (optional) Creme Topping
  • 1 Young Coconut (Meat & Water)
  • 2 tsp Ground White Chia (black chia is fine; it will just make the topping more "speckled")
  • Seeds from 1/3 Vanilla Pod (or 1/2 tsp Vanilla Extract)
  • pinch Sea Salt

Soak the dates (for the filling only) in the 1/2 cup of water for 4-6 hours or overnight.
Peel, core, and dice the apples into small, bite-sized pieces.

In a blender or mini blender, puree the soaked dates, with their soaking water, until smooth. Add the cinnamon, ginger, nutmeg, lemon juice, and salt; give the blender a a few quick pulses to make sure all the ingredients are thoroughly incorporated.

Add the date mixture to the diced apples, and gently stir enough to ensure the all of apples are evenly coated. Allow the apples to marinate, covered in the refrigerator, for at least 8 hours or overnight.
Wait until the apples have marinated sufficiently, before you begin to prepare the crust.

In a blender or mini blender using the grind attachment, pulse the shredded coconut until it develops a fine, more flour-like consistency. Take care not to over-blend, or it will begin to turn into coconut butter.

Add the coconut, dates, coconut oil, vanilla and salt to a food processor, and blend until the dates have combined smoothly and evenly. If your dates are on the harder/drier side, soak them in room temperature, filtered water for 10-15 minutes; remove them from the soaking water before blending with the other crust ingredients.

Use a mini tart pan, or line 12 muffin tins with muffin cups. Press the crust mixture evenly into the tins/cups to create a crust that is approximately 1/8" thick. If using muffin cups, create a crust that is between 1/2" to 3/4" tall.
When all the crusts are prepared, spoon the apple filling into each crust, allowing the filling to come slightly above the rim of the crust. Allow the tarts to chill and set in the refrigerator for 2-3 hours or overnight.
Trim any excess paper from the muffin liners, once the tarts are set.

If using/adding the Creme Topping, set the tarts in the refrigerator, while you prepare as follows:
Crack open the coconut. Pour the coconut water into a separate bowl, and scoop out the coconut meat.

In a high-powered blender, combine the coconut meat, chia, vanilla and salt, along with half of the coconut water.The goal is to blend the coconut meat until it is completely smooth. The trick is to use as little liquid as possible, in order to retain a thick consistency. This may require some patience.

If you find the mixture getting stuck or unable to blend, gradually add some of the remaining coconut water, in small increments - just enough to get the mixture blending.

Once the mixture is well-blended and smooth, spoon a dollop onto each tart, and allow the tarts to continue to chill for the recommended time (above).
Feel free to blend in a few drops of stevia, a couple teaspoons of coconut nectar, or 1-2 soaked dates, if you prefer a sweeter creme.
Enjoy!!


1. Fear not, dear readers. Those treats are on their way, so keep an eye out :-) 
2. You decide.
3. Tiny pies, obviously.
Read more ...