
**UPDATE: So Delicious no longer makes the Coconut Milk Kefir; however, they now make unsweetened versions of their Plain and Vanilla Cultured Coconut Milk "yogurt".
Read more ...
[happiness]
You can use it in place of the kefir in this recipe. Keep in mind that the consistency is thicker, so you may need an additional tablespoon or two.**
Sometimes, I feel like I have a rather eclectic palate, and some of the things I enjoy might not necessarily be appreciated by others.
I don't share all of my concoctions - particularly ones that fall into the above "category".
Is this a disclaimer? I suppose it could be, for what follows is exactly one such creation.
So, I don't know that I would have felt inclined1 to post this recipe on my own (see above). However, I recently responded to a query of how people use kefir - So Delicious® Coconut Milk Kefir, to be specific. Once I'd spilled a couple of ideas, I received some requests for the recipes.
Willing to oblige, I decided to go with my Cheezecake Truffles. They're packed with protein, beneficial probiotics, and MCFAs; contain no sugars; and taste like dessert.
Win-win-win.
I always use/consume the plain coconut kefir- I love it! It's So Delicious' one "yogurt" product that is unsweetened. Now if only they'd make an unsweetened version of their plain yogurt (see Update above!). Please note: I'm hardly complaining; I simply prefer my vegan "milks" and "yogurts" unsweetened, but I digress... The So Delicious vanilla kefir could also be used here successfully, if you prefer. It does have added sweeteners though, so the resulting truffles would not be free of sugars.
In order to get a nice consistency, a good protein powder is important - you want one that isn't gritty.
My choice of protein powder makes these high-raw. I like (and use) Garden of Life Raw Protein - it's vegan, raw, gluten free, soy free, and no added sweeteners.2 It's pretty fine3, and I don't find it to be particularly gritty, but there may be/are probably smoother protein powders out there; use whatever you like best.
These can also be made using a mild nut butter (cashews and macadamias, I'm looking at you) or soaked and blended nuts. For the sake of allergy-friendliness, I'll be sharing the non-nut version here.
Healthy Cheezecake Truffles
(makes 12 truffles)
Prepare the coating: Pulse the coconut in a coffee grinder or mini blender, using the grinder blade attachment, until powdery. Mix in the cinnamon, nutmeg and sea salt, and set aside.
Make sure your coconut oil is liquid or very very soft/melty. If it's solid, you can gently warm it by placing the jar in a a bowl of very warm water.
In a small bowl combine the protein powder and sea salt. Add in the coconut oil and blend well - I found using a fork works well. You want the oil to fully combine with the protein powder; the resulting consistency should be something like a crumbly paste that will stick/clump together when pressed.
Begin to add the kefir ONE tablespoon at a time. This is important, if you add it all at once, it will cool the coconut oil too quickly. Be patient and deliberate; after each tablespoon, stir in the kefir, until it is completely blended. It must be completely blended before adding the next tablespoon.
After all of the kefir has been blended in, the mixture should be the consistency of a very thick, but very smooth paste or "dough". Set the truffle dough in the refrigerator to chill for 20-30 minutes (or longer, if necessary to firm up the mixture), before rolling out the truffles.
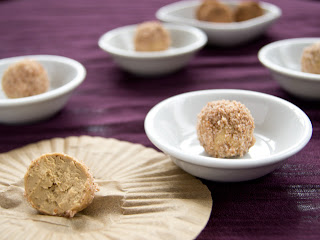
Spread the coconut coating into a shallow dish or plate. Have an additional clean plate, to place the finished truffles.
Remove the truffle batter from the fridge, and working quickly, roll a small chunk of dough between your palms, to form a 1" ball. Gently toss/roll the truffle into the coating, and set onto the clean plate. Repeat.
Pop the truffles into the fridge to set for at least 1 hour. The flavor and consistency really develops, if left longer or overnight.
Serve and enjoy!
Modifications/Substitutions:
Try not to scarf them all in one sitting ;-) But if you do, enjoy the fact that your truffles were loaded with healthy nutrients (and dare I say, almost a meal!?), as opposed to simply empty calories.
1. Read: brave enough.
2. Did I mention it's raw?
3. In more ways than one.
4. DIY in a coffee grinder or mini blender using the grinder blade attachment
I don't share all of my concoctions - particularly ones that fall into the above "category".
Is this a disclaimer? I suppose it could be, for what follows is exactly one such creation.
So, I don't know that I would have felt inclined1 to post this recipe on my own (see above). However, I recently responded to a query of how people use kefir - So Delicious® Coconut Milk Kefir, to be specific. Once I'd spilled a couple of ideas, I received some requests for the recipes.
Willing to oblige, I decided to go with my Cheezecake Truffles. They're packed with protein, beneficial probiotics, and MCFAs; contain no sugars; and taste like dessert.
Win-win-win.
 |
| Decadent, healthy Cheezecake Truffles! |
In order to get a nice consistency, a good protein powder is important - you want one that isn't gritty.
My choice of protein powder makes these high-raw. I like (and use) Garden of Life Raw Protein - it's vegan, raw, gluten free, soy free, and no added sweeteners.2 It's pretty fine3, and I don't find it to be particularly gritty, but there may be/are probably smoother protein powders out there; use whatever you like best.
These can also be made using a mild nut butter (cashews and macadamias, I'm looking at you) or soaked and blended nuts. For the sake of allergy-friendliness, I'll be sharing the non-nut version here.
Healthy Cheezecake Truffles
(makes 12 truffles)
- 1/2 Cup (50g) Garden of Life Raw Protein (other powders may have different weights; measure by volume, if using something else)
- 2 Tbsp Virgin Coconut Oil
- Pinch Sea Salt
- 5-8 Tbsp So Delicious Unsweetened Plain Cultured Coconut Milk
- 3/4 tsp Vanilla Extract (or seeds from 1/2 pod)
- 16-20 Drops Liquid Stevia
- 3 Tbsp Shredded Coconut (ground to a fine consistency)
- 1/8 Tsp Cinnamon
- Pinch Nutmeg
- Pinch Sea Salt
Prepare the coating: Pulse the coconut in a coffee grinder or mini blender, using the grinder blade attachment, until powdery. Mix in the cinnamon, nutmeg and sea salt, and set aside.
Make sure your coconut oil is liquid or very very soft/melty. If it's solid, you can gently warm it by placing the jar in a a bowl of very warm water.
In a small bowl combine the protein powder and sea salt. Add in the coconut oil and blend well - I found using a fork works well. You want the oil to fully combine with the protein powder; the resulting consistency should be something like a crumbly paste that will stick/clump together when pressed.
Begin to add the kefir ONE tablespoon at a time. This is important, if you add it all at once, it will cool the coconut oil too quickly. Be patient and deliberate; after each tablespoon, stir in the kefir, until it is completely blended. It must be completely blended before adding the next tablespoon.
After all of the kefir has been blended in, the mixture should be the consistency of a very thick, but very smooth paste or "dough". Set the truffle dough in the refrigerator to chill for 20-30 minutes (or longer, if necessary to firm up the mixture), before rolling out the truffles.

Spread the coconut coating into a shallow dish or plate. Have an additional clean plate, to place the finished truffles.
Remove the truffle batter from the fridge, and working quickly, roll a small chunk of dough between your palms, to form a 1" ball. Gently toss/roll the truffle into the coating, and set onto the clean plate. Repeat.
Pop the truffles into the fridge to set for at least 1 hour. The flavor and consistency really develops, if left longer or overnight.
Serve and enjoy!
Modifications/Substitutions:
- Don't mind sugars/cane sugar? Sub Vanilla kefir and reduce the amount of sweetener.
- Not into stevia? Sub 1T to 2T powdered4 coconut palm sugar - add it to the kefir, as you would have the stevia
- Don't have a nut allergy? Try finely crushed walnuts/pecans/almonds/hazelnuts in place of the coconut for the coating.
- Crushed raw cacao nibs make a lovely coating as well. If their natural bitterness (which I quite like) doesn't appeal, toss them with a couple drops of stevia or powdered coconut palm sugar - you can also find already sweetened cacao nibs.
- Chocolate Cheezecake Truffles: Add 2T unsweetened cocoa powder; reduce protein powder by 1T
 |
| How about CHOCOLATE Cheezecake Truffles? |
1. Read: brave enough.
2. Did I mention it's raw?
3. In more ways than one.
4. DIY in a coffee grinder or mini blender using the grinder blade attachment


 using the grinder attachment), process the coconut flakes into a crumbly paste. It should turn out almost like a coconut flour, but not quite. The goal is to pulverize the little coconut pieces into a fine powder.


